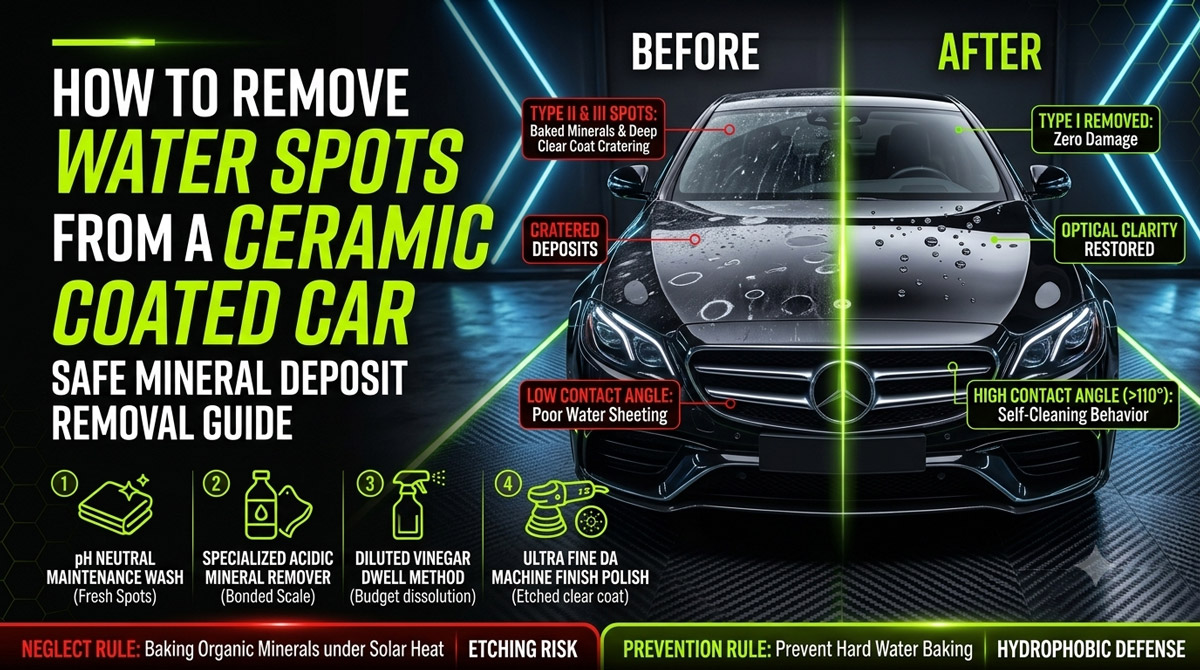
Ceramic coatings offer extraordinary surface gloss, incredible chemical durability, and supreme hydrophobic self cleaning behavior. Car owners spend hundreds to thousands of dollars applying silicon dioxide SiO2 or titanium dioxide TiO2 nano coatings to protect automotive clear coats against ultraviolet oxidation, environmental fallout, and road grime. However, many vehicle owners experience sudden surprise when discovering stubborn white rings, chalky outlines, or cratered mineral deposits across their freshly coated panels.
A common myth in the automotive detailing community suggests that nano ceramic coatings render vehicles entirely immune to water spotting. In reality, the high surface tension inherent to hydrophobic coatings can cause water droplets to stand tall in spherical beads. When hard water standing on vehicle panels evaporates under direct sunlight, concentrated mineral solids remain behind. If unaddressed, these mineral salts bond aggressively to the quartz layer.
This comprehensive technical guide outlines exact chemical and mechanical protocols required to remove water spots ceramic coating safely. By understanding mineral bonding chemistry and following a progressive decontamination strategy, you will restore optical clarity and hydrophobic performance to your ceramic coated vehicle without compromising the protective film underneath.
Water Spot Decontamination Escalation Ladder
Always progress from the mildest chemical method to mechanical polishing only when strictly necessary.
Water Spot Removal Escalation Protocol
Start at Stage 1 and progress downward only if the defect persists
Understanding Water Spot Types and Mineral Chemistry
Not all hard water marks on ceramic coating are created equal. Before selecting a corrective technique, detailers must accurately classify the severity of the contamination. Mineral deposit removal car paint methods depend heavily upon whether mineral salts rest topically on top of the coating or have chemically etched into the underlying clear coat structure.
Automotive paint experts categorize water spots into three distinct classifications based on mineral composition, depth of penetration, and surface damage:
Type I Hard Water Spots: Superficial Mineral Crusts
Type I water spots occur when municipal tap water, garden hose runoff, or rain water sits on paint panels and evaporates completely under sun exposure. High water Total Dissolved Solids TDS levels leave behind hard white mineral crusts composed primarily of calcium carbonate, calcium magnesium, and sodium compounds. These minerals sit directly on top of the hydrophobic ceramic shell without penetrating the matrix. Type I spots feel raised or slightly textured to touch, but they have not chemically eaten into the paint.
Type II Hard Water Spots: Subsurface Etched Minerals
Type II water spots form when mineral deposits remain on paintwork for extended periods under intense heat, solar radiation, or acid rain conditions. Chemical acid compounds inside evaporating water concentrate rapidly, creating localized chemical burns. In ceramic coated vehicles, Type II spots etch into the top sacrificial hydrophobic layer of the coating film. When viewed under high intensity detailing lights, Type II spots appear as faint rings or shallow craters even after physical surface wiping.
Type III Hard Water Spots: Sub clear Coat Cratering
Type III water spots represent extreme chemical degradation where high temperature mineral acid reactions have cut completely through the ceramic film, entering the clear coat layer below. This occurs frequently when unmaintained cars park near lawn irrigation sprinklers continuously under summer heat. Type III spots cannot be dissolved chemically because the physical structure of the clear coat contains permanent micro craters. Restoring uniform optical depth requires precision abrasive machine polishing.
Why Ceramic Coatings Experience Water Spots
A frequent point of confusion for car owners is why professional ceramic coatings suffer from hard water spots despite boasting extreme hydrophobic claims. Understanding coating science clarifies this phenomenon.
Ceramic coatings utilize cross linking polymer chains infused with silicon dioxide SiO2 or titanium dioxide TiO2. These formulas form a tight quartz crystal matrix that repels liquid water, creating sky high contact angles often exceeding 110 degrees. High contact angles cause standing water to pull itself into tall, perfectly round beads rather than flat sheets.
When a vehicle sits under hot sunlight after rainfall or sprinkler overspray, ambient heat warms vehicle body panels quickly. Atmospheric heat causes the water content within standing droplets to evaporate rapidly. However, solid dissolved minerals within the water droplet cannot evaporate. Because hydrophobic beads hold water within tight circular boundaries, dissolved mineral ions remain trapped within a concentrated tiny footprint. As water turns to vapor, these minerals crystalize directly over the ceramic lattice.
While ceramic coatings resist strong acids and bases far better than traditional carnauba waxes or synthetic polymer sealants, unmaintained mineral scale left on vehicle surfaces under extreme solar heat will eventually cause chemical localized etching.
Stage 1: The Standard Maintenance Wash Protocol
When treating fresh hard water spots on ceramic coating under 72 hours old, vehicle owners should always begin with a meticulous standard maintenance wash. Fresh mineral dust often remains sitting loosely on the hydrophobic quartz layer, allowing effortless removal without specialized acidic chemicals.
Crucial Rule for Maintenance Washing
Never wash or rinse your vehicle under direct sunlight or on warm body panels. Surface temperatures above 90 degrees Fahrenheit cause wash soap and rinse water to dry rapidly, creating instant fresh hard water scale across vehicle panels.
Required Equipment for Maintenance Decontamination
- Two clean 5 gallon wash buckets equipped with bottom grit guards
- High lubrication pH neutral automotive shampoo formulated without added gloss enhancers or waxes
- High density microfibre wash mitts made from plush split microfibre strands
- Deionized water or filtered rinse water source
- Extra large twist loop microfibre drying towel or touchless filtered air blower
Step by Step Maintenance Wash Procedure
- Perform a Thorough Initial Pre Rinse: Spray cold pressurized water over the entire vehicle body starting from roof panels working downward. Pre rinsing cools vehicle sheet metal while removing heavy surface grit that could inflict swirl marks during manual washing.
- Prepare Two Bucket Wash Solution: Fill the first bucket with clean water and shampoo, agitating vigorously to generate thick lubricated lather. Fill the second bucket with pure clean rinse water.
- Execute Gentle Microfibre Wash Passes: Dip your clean microfibre mitt into soapy water, then gently glide across paint sections in straight overlapping lines. Avoid applying heavy downforce pressure. Allow high lubrication soap surfactants to lift surface mineral salts.
- Rinse Mitt Frequently: After washing a single panel section, submerge the wash mitt into your dedicated rinse bucket, agitating against the bottom grit guard to drop trapped debris before gathering fresh wash soap.
- Execute Deionized Water Rinse: Flush all soap residue off vehicle panels using clean water.
- Perform Immediate Forced Air or Towel Drying: Dry vehicle surfaces immediately using a filtered air blower or by gliding a clean plush twist loop microfibre drying towel across panels. Leaving rinse water droplets to air dry will instantly reintroduce fresh mineral deposits.
If mineral outlines remain clearly visible after completing a maintenance wash, mineral salts have chemically bonded to the coating, requiring Stage 2 acidic chemical decontamination.
Stage 2: Using Dedicated Acidic Water Spot Removers
When mineral scale fails to lift during a standard wash, dedicated acidic water spot removers designed specifically for ceramic coatings represent the safest, most effective solution. Ceramic coat water spot removal chemical products utilize mild organic or mineral acids formulated at calibrated pH levels between pH 2 and pH 3. These acidic formulas break the chemical bond holding mineral ions to silica glass coatings without dissolving the resilient SiO2 backbone layer.
Water Spot Chemistry: pH Level & Chemical Safety Guide
pH 0 to 1.5: Dangerous Heavy Acids
Hydrofluoric or industrial acids. Extremely hazardous. Will strip ceramic coatings instantly and damage surrounding chrome or glass trim.
pH 2.0 to 3.5: Ideal Acidic Spot Remover
Calibrated organic acidic cleaners. Dissolves calcium carbonate bonds effectively while remaining completely safe for SiO2 ceramic coatings.
pH 7.0: Pure Neutral Maintenance Soap
Balanced wash shampoos. Great for lifting organic dirt, dust, and fresh unbonded minerals during routine weekly washes.
Selecting a Safe Chemical Water Spot Remover
When purchasing a commercial product, ensure the label explicitly states it is safe for professional nano ceramic coatings, painted clear coats, glass, and automotive trim. Highly rated industry products include CarPro Spotless 2.0, Gtechniq W9 Water Spot Remover, and Koch Chemie W9. Avoid cheap industrial wheel acids or hydrofluoric acid formulas, as extreme acids will etch sensitive glass and degrade clear coats.
Step by Step Acidic Chemical Application
- Wash and Dry the Vehicle First: Never apply chemical water spot removers onto dirty vehicle paint. Gritty dirt particles trapped under a microfibre towel during chemical wiping will inflict severe clear coat swirl marks.
- Move Vehicle to a Cool Shaded Area: Ensure vehicle paintwork is cool to touch. Never apply acidic removers in direct sunlight or onto hot hood panels.
- Work in Small Controlled Sections: Limit chemical treatment areas to manageable 2 foot by 2 foot paint sections at one time.
- Apply Product to Microfibre Towels: Spray water spot remover directly onto a clean, short pile microfibre towel until damp. Avoid spraying heavy chemical mists directly onto dry car panels to prevent overspray drift.
- Gently Spread and Allow Chemical Dwell Time: Wipe the damp towel over spotted areas using light overlapping motions. Allow the acidic chemical to dwell on paint surfaces for 30 to 60 seconds. Dwell time permits acid molecules to break down solid mineral salts. Do not permit product to dry completely on paintwork.
- Neutralize Acid and Wipe Clean: Immediately wipe the treated section with a secondary microfibre towel thoroughly soaked in water or a diluted alkali prep spray. Neutralizing stops ongoing acidic chemical reactions.
- Final Inspection and Reapplication: Inspect panels under bright LED detailing lights. If faint Type I mineral spots linger, repeat chemical dwell steps once more.
Stage 3: Vinegar Solution (DIY Budget Alternative)
If commercial acidic removers are unavailable, distilled white vinegar offers an accessible, budget friendly DIY alternative for dissolving mild calcium mineral scale. Vinegar contains natural acetic acid at roughly 5 percent concentration by volume, yielding a working pH level around pH 2.4.
While vinegar water spots ceramic coating methods can prove effective for light mineral marks, car owners must execute this DIY process with proper preparation to avoid unexpected finish damage.
The Science of Vinegar Mineral Dissolution
Acetic acid inside white vinegar reacts chemically with solid calcium carbonate deposits resting on vehicle surfaces. The acidic reaction converts insoluble calcium carbonate into soluble calcium acetate, water, and carbon dioxide gas, allowing mineral rings to rinse away easily.
Essential Vinegar Precautions for Ceramic Coatings
- Never use concentrated pickling vinegar or industrial acetic acid with concentrations above 5 percent.
- Always use distilled water for dilution. Mixing vinegar with unfiltered municipal tap water reintroduces hard minerals onto vehicle panels.
- Never permit vinegar solutions to dwell on raw aluminum trims, unpainted plastics, or custom hot rod single stage paints.
- Always execute a post vinegar neutralization wash to remove residual acid films.
Step by Step Vinegar Application Protocol
- Prepare 50/50 Diluted Vinegar Mix: Combine equal parts pure distilled white vinegar and pure distilled water inside a clean spray bottle. Shake vigorously to ensure balanced solution mixing.
- Saturate Microfibre Towel: Spray the 50/50 vinegar mixture liberally onto a clean microfibre applicator pad or plush microfibre towel.
- Drape or Wipe Over Affected Spots: Place the soaked microfibre towel gently directly over spotted paint areas, letting it rest undisturbed for 1 to 2 minutes. This targeted soak allows mild acetic acid to break down calcium deposits safely.
- Gentle Surface Wipe: Gently wipe the soaked towel across the panel using straight lines to remove loosened mineral debris.
- Neutralize and Flush Thoroughly: Rinse the panel thoroughly with clean water, then wash the area with standard pH neutral wash soap to neutralize residual acidic films completely. Dry immediately with a clean drying towel.
Stage 4: Light Machine Polishing for Etched Spots
When hard water spots remain visible after attempting both dedicated acidic removers and vinegar dwell treatments, mineral salts have progressed into Type II or Type III subsurface etching. Acidic chemicals cannot dissolve physical craters or grooves cut into paint layers. Removing etched water spots ceramic coat surfaces requires controlled mechanical abrasive leveling using a dual action DA machine polisher.
Important Warning Regarding Machine Polishing
Machine polishing utilizes micro abrasives to remove a microscopic layer of surface material. Polishing a ceramic coated panel will thin down or completely shave off the ceramic quartz layer in treated areas. After machine polishing, you must reapply a ceramic topcoat or silica booster spray to restore full environmental protection.
Selecting Polishing Tools for Ceramic Coatings
To minimize ceramic coating removal while successfully leveling light Type II etching, detailers must utilize ultra fine finishing compounds paired with soft foam finishing pads.
- Machine Polisher: Random orbital dual action DA polisher with a 12mm or 15mm throw
- Polishing Pad: Ultra soft finishing foam pad (such as black or red foam finishing pads)
- Finishing Polish: Non abrasive ultra fine micro finishing polish formulated without heavy silicone fillers or petroleum waxes (such as CarPro Essence, Sonax Perfect Finish, or Rupes Uno Pure)
- Surface Prep Wipe: Isopropyl alcohol IPA spray or dedicated paint panel wipe solution
Step by Step Machine Polishing Protocol
- Complete Full Wash and Decontamination: Wash the vehicle thoroughly and perform chemical iron decontamination to clear surface particles.
- Prime Finishing Foam Pad: Apply 3 to 4 pea sized dots of ultra fine finishing polish evenly across your soft foam finishing pad face.
- Set Low Polisher Machine Speed: Place pad flat against affected paint panels. Spread polish across a 2 foot by 2 foot section on speed setting 1 or 2.
- Execute Controlled Polishing Passes: Increase machine speed to medium setting (speed setting 3 or 4). Work polisher across paint panels in slow, overlapping crosshatch patterns using light arm pressure. Complete 3 to 4 complete passes over the spotted section.
- Wipe Polish Residue: Buff away spent polish haze using a clean microfibre buffing towel.
- Inspect Surface with Panel Wipe: Spray isopropyl alcohol panel wipe over the polished surface and buff clean. Panel wipes remove polishing oils, exposing true clear coat conditions. Inspect under detailing lights to confirm complete spot elimination.
- Reapply Ceramic Coating Protection: Because machine polishing shaves down ceramic protective layers, immediately reapply a fresh layer of ceramic topcoat spray, silica ceramic booster, or original ceramic coating resin over treated panels to restore hydrophobic defense.
Myth Busting: Clay Bar Safety on Ceramic Coatings
A widespread recommendation across automotive forums suggests using detailing clay bars to scrub stubborn hard water marks off vehicle paintwork. However, professional ceramic installers strongly advise against using clay bars on ceramic coated vehicles for water spot remediation.
Clay bar on ceramic coating safety must be understood clearly:
- Clay Bars Target Solid Above Surface Particles: Clay bars function as sticky abrasives designed to pull embedded iron filings, tree sap, and road tar off clear coat surfaces.
- Mineral Spots Are Dissolved Salts: Water spots are mineral scale deposits, not organic stuck dirt. Physical claying simply glides over hard mineral rings without dissolving mineral chemical bonds.
- Claying Inflicts Micro Marring: Traditional medium or aggressive clay bars create fine abrasion marks across ceramic glass coatings. This dulls surface gloss and degrades hydrophobic topcoats without removing deeply etched spot rings.
Save clay bar decontamination strictly for preparing raw uncoated clear coats prior to initial paint correction. For ceramic coated vehicles, rely on chemical acidic dissolution first, reserving gentle DA machine polishing as a last resort.
Proactive Prevention: How to Stop Water Spots Returning
Eliminating water spots from your vehicle requires chemical effort and time. The most efficient long term strategy focuses on preventing hard water deposits from forming on your ceramic coating in the first place.
Follow these proven detailing prevention rules to preserve your ceramic investment:
1. Eliminate Washing Under Direct Solar Heat
Never wash, rinse, or detail your vehicle under direct bright sunlight or during peak afternoon temperatures. Wash your vehicle inside a shaded garage, under a canopy, or early in the morning when paint sheet metal feels cold to touch.
2. Never Allow Rainwater or Tap Water to Air Dry
Rainwater passing through urban atmospheres absorbs airborne industrial pollutants and sulfur compounds. Municipal tap water contains heavy calcium minerals. Never leave rainwater or hose water droplets to evaporate naturally on vehicle panels. Always dry your car immediately following rain exposure or washing.
3. Maintain Sacrificial Hydrophobic Ceramic Boosters
Apply a high quality SiO2 ceramic booster spray or ceramic quick detailer every 2 to 3 months following routine maintenance washes. Ceramic boosters create a sacrificial top barrier over your base coating. When hard water lands on vehicle paint, mineral salts attack the temporary booster layer rather than etching into your permanent ceramic coating installation.
4. Install an In Line Deionizing Water Filter
If your residential water supply exhibits high Total Dissolved Solids TDS mineral hardness (above 100 PPM), install an in line deionizing resin water filter system onto your garden hose or pressure washer setup. Deionized water filtration strips dissolved calcium, magnesium, and mineral salts completely, providing pure zero PPM rinse water that leaves no white spots even if minor droplets remain.
5. Park Away from Automatic Irrigation Sprinklers
Never park your vehicle near lawn sprinklers or commercial irrigation systems. Lawn irrigation systems tap directly into unfiltered hard ground water or reclaimed water sources packed with heavy iron, sulfur, and calcium minerals. Sprinkler overspray baking under solar heat creates severe Type III mineral etching faster than almost any other environmental hazard.
Frequently Asked Questions
Will vinegar strip or ruin my professional ceramic coating?
No. Diluted 50/50 white vinegar containing 5 percent acetic acid will not strip or dissolve cured SiO2 or TiO2 ceramic coatings. Professional nano coatings possess high chemical resistance capable of withstanding mild organic acids. However, vinegar should never be permitted to dry on vehicle panels, and treated sections should always be thoroughly flushed with clean water after use.
Can I use household glass cleaners to remove water spots from ceramic paint?
No. Standard household glass cleaners frequently contain heavy ammonia, artificial dyes, or aggressive solvent surfactants. Ammonia cleaners can streak paint finishes and degrade delicate ceramic topcoat layers. Always utilize dedicated automotive acidic water spot removers formulated explicitly for vehicle paint safety.
How often should I apply a ceramic booster spray to prevent water spotting?
Detailing experts recommend applying a dedicated SiO2 ceramic maintenance booster spray every 60 to 90 days. Regular booster application reinforces surface hydrophobic contact angles and maintains a smooth sacrificial layer that prevents mineral salts from bonding directly to your base ceramic coat.
Why do water spots look worse on dark colored ceramic coated cars?
Dark paint colors such as jet black, deep navy blue, or charcoal metallic absorb solar thermal radiation far faster than white or silver paints. High panel heat accelerates liquid water evaporation, causing minerals to crystalize in minutes while intensifying thermal etching into clear coat layers. Furthermore, white mineral crusts create stark visual contrast against dark backgrounds.
Conclusion: Restoring Perfection to Ceramic Coated Paintwork
Experiencing hard water spots on ceramic coating can prove frustrating, but removing these unsightly mineral marks does not require risking your vehicle paint finish. By diagnosing whether your vehicle suffers from Type I superficial scale, Type II subsurface etching, or Type III cratered damage, you can execute a safe, targeted decontamination process.
Always follow the progressive decontamination escalation model: begin with a gentle pH neutral maintenance wash, advance to calibrated acidic water spot removers or diluted white vinegar solutions, and reserve gentle DA machine finishing polishing strictly for severe etched conditions. Combining proper chemical techniques with proactive washing habits ensures your ceramic coated vehicle maintains brilliant mirror gloss, extreme hydrophobicity, and unblemished paint protection for years to come.
Next Step: Keep Your Vehicle Flawless
Ready to safeguard your ceramic coating against environmental damage and hard water scale? Download our free comprehensive Ceramic Coating Aftercare & Maintenance Checklist to master professional car care techniques at home. For severe Type III water spot etching or professional paint correction support, contact our certified detailing specialists today to schedule an expert paint restoration consultation!