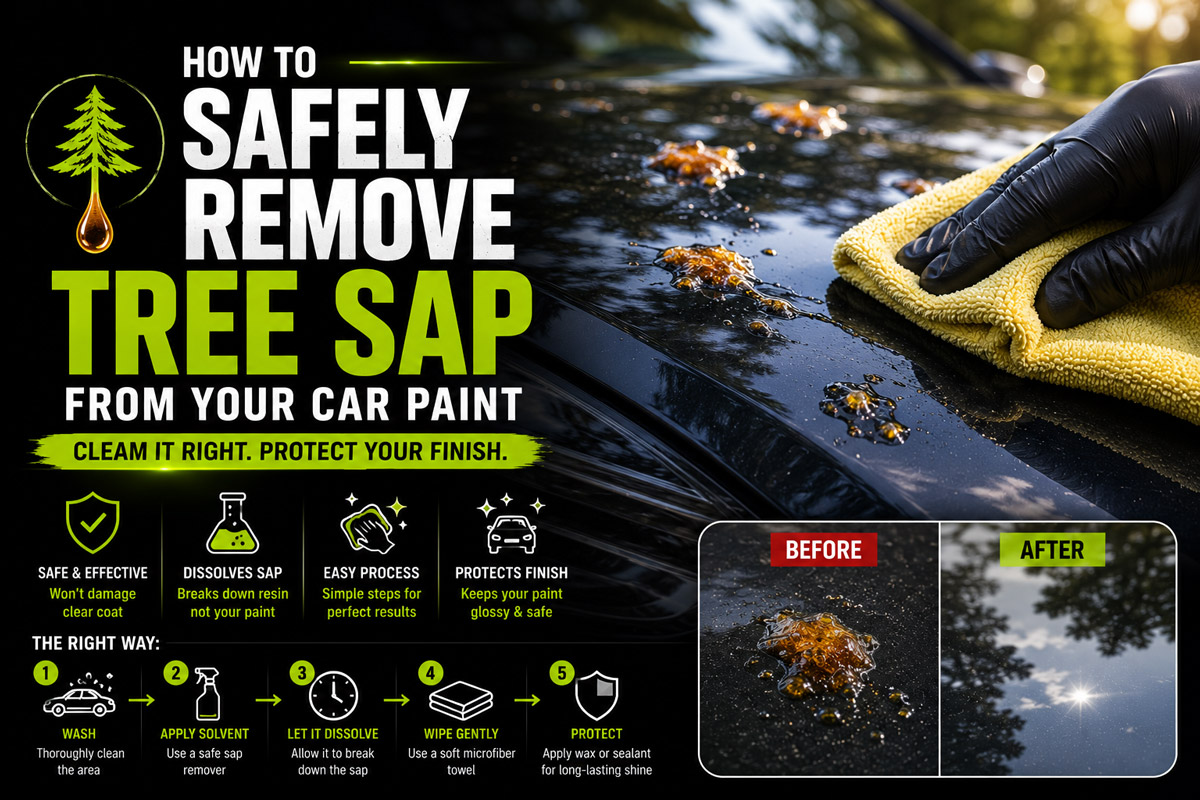
Parking your vehicle under majestic shade trees offers relief from sweltering summer heat, but it often leaves behind a stubborn, sticky nightmare: tree sap. Whether it appears as fresh, tacky pine drops or rock hard, sun baked amber spots, tree sap is one of the most destructive organic contaminants your vehicle can face. Left untreated, organic sap acids and sticky terpenes bond directly to your vehicle clear coat, shrinking as they dry and pulling on the paint layer beneath. Under intense heat and sun exposure, this reaction causes permanent clear coat etching, discoloration, and microscopic cracking.
Many well meaning car owners make the costly mistake of aggressively scrubbing sap spots with sponges, fingernails, or harsh household rags. Mechanical friction on hardened sap acts like dragging sandpaper across your delicate finish, creating deep swirl marks and gouges that require expensive professional paint correction.
The secret to eliminating tree sap without damaging clear coat lies in chemical dissolution rather than mechanical force. By using the correct solvent, allowing proper chemical dwell time, and employing ultra soft microfiber towels, you can break down sticky resin bonds effortlessly. In this comprehensive master guide, you will learn the exact step by step chemical removal protocol, how to evaluate safe household and commercial solvents, surface specific techniques for paint, glass, and trim, and how to restore long term clear coat protection.
Understanding Tree Sap Chemistry vs Vehicle Paint Clear Coat
To successfully remove tree sap without inflicting paint damage, one must first understand what tree sap is and how modern automotive clear coat reacts to organic solvents. Tree sap is not merely sticky water. It is a complex organic compound composed of resinous hydrocarbons, terpenes, pinene, sugar alcohols, and natural organic acids. When sap exudes from pine, maple, oak, or birch trees, it begins liquid and volatile. However, as oxygen and sunlight react with the sap, volatile compounds evaporate, leaving behind a hard, crystalline resin structure that functions almost identically to commercial superglue.
Modern vehicle finishes consist of a three layer system: the primer base, the color coat, and a thin, transparent layer of clear coat polyurethane or acrylic resin measuring approximately 1.5 to 2.0 mils thick. The clear coat serves as the primary barrier against ultraviolet rays, oxidation, road salt, and environmental debris.
When tree sap sits on the clear coat under direct sunlight, two harmful processes occur simultaneously:
- Thermal Expansion and Contraction: During daytime heat, your car body panel expands and the clear coat softens slightly. The sap spot heats up and expands as well. At night, as temperatures drop, the clear coat hardens while the sap contracts at a different rate, physically pulling and straining the microscopic structure of the clear coat.
- Acidic Etching: Natural organic acids contained within pine and hardwood sap slowly leach into the clear coat resin matrix, creating deep chemical cratering known as sap etching.
Attempting to scrape or scrub hardened sap mechanically concentrates massive localized force on the brittle clear coat edge. This results in clear coat shearing, micro scratching, and paint hazing. Chemical dissolution solves this by introducing a compatible solvent that breaks down the resinous terpene bonds, returning the solid sap back into a soft, liquid emulsification that wipes away with zero downward pressure.
Phase 1: Essential Preparation and Pre Wash Protocol
Before applying any solvent or chemical cleaner to your vehicle, you must execute a thorough surface preparation. Applying solvents to a dusty or dirty vehicle panel creates an immediate scratch hazard, as loose road grit and silica dust get trapped under your wiping pad.
Step 1: Work Exclusively in the Shade on Cool Panels
Never apply solvents, rubbing alcohol, or sap removers in direct sunlight or onto warm body panels. Heat causes liquid solvents to flash evaporate within seconds, preventing them from penetrating the sap structure. Rapid evaporation can also concentrate chemical residues on the warm clear coat, leading to temporary staining or finish dulling. Move the vehicle into a garage or shaded area and ensure panels are cool to the touch before proceeding.
Step 2: Perform a High Lubricity Pre Wash
Wash the affected area and surrounding body panels thoroughly using warm water and a high lubricity automotive car wash shampoo. This step removes surface dirt, dust, bird droppings, and loose environmental debris. Use a clean microfiber wash mitt and the two bucket washing method to prevent introducing swirl marks. Rinse completely with clean water.
Step 3: Dry the Surface Completely
Wipe the sap area completely dry using a clean, high gsm plush microfiber drying towel. Eliminating standing water is critical because residual moisture creates a barrier that dilutes chemical solvents, dramatically reducing their effectiveness and increasing required dwell time.
Phase 2: Comprehensive Solvent Evaluation Matrix
Selecting the right solvent depends on the sap age, thickness, surface material, and available supplies. Below is a detailed technical comparison of safe household and commercial automotive sap solvents.
Performance and Safety Comparison Chart
Below is a visual representation of how different chemical solvents perform when balancing sap breakdown speed against vehicle paint preservation.
Phase 3: Step by Step Chemical Sap Removal Protocol
Follow this exact multi step methodology to eliminate sap spots safely from painted surfaces.
Step 1: The Saturate and Dwell Technique
Pour a generous amount of 91% isopropyl alcohol or your chosen commercial sap remover onto a clean, folded microfiber cloth or foam applicator pad. Do not spray solvent directly onto the car panel, as wind drift can waste product or cause overspray onto unwashed areas.
Place the saturated cloth directly over the sap spot. Press down gently so the cloth makes complete contact with the sap mound. Hold the cloth in place for 30 to 60 seconds without rubbing. This dwell period allows the chemical solvent to penetrate the hard outer shell of the sap resin and dissolve the crosslinked terpene polymers.
Step 2: The Zero Pressure Wipe
After 60 seconds, gently lift the cloth and observe the sap. The once brittle, sticky blob should now appear softened, milky, or semi liquid. Using a clean section of your saturated microfiber cloth, wipe the softened sap away using light, circular motions.
Let the chemical solvent perform the heavy lifting. Never apply heavy downward pressure or push aggressively against the paint. If residual sticky sap remains, re saturate your towel and repeat the 60 second dwell process.
Step 3: Managing Thick Sun Baked Sap Bulges
When dealing with massive pine sap drops that have hardened under months of intense sun exposure, chemical solvents may only dissolve the top outer shell. Attempting to force the entire mound off at once can tear at the clear coat.
- Saturate the sap spot for 60 seconds to soften the top layer.
- Take a soft plastic razor blade designed specifically for automotive paint care.
- Lubricate the surface generously with isopropyl alcohol or quick detailer spray.
- Hold the plastic razor blade at a shallow 45 degree angle relative to the paint.
- Gently shave away the softened upper half of the sap deposit using short, controlled strokes.
- Reapply solvent to the remaining lower layer, allow it to dwell for 30 seconds, and wipe the softened base away completely with a microfiber towel.
Surface Specific Techniques: Glass, Plastic Trim, and Rubber
Different vehicle materials require specialized handling to prevent chemical degradation or cosmetic damage.
1. Removing Tree Sap from Car Glass and Windows
Glass is non porous and far more resilient than painted clear coat, making sap removal on windshields and side windows straightforward.
- Primary Solvent: 91% Isopropyl alcohol or acetone based glass cleaners.
- Mechanical Tool: A brand new stainless steel razor blade held at a low 30 degree angle, or fine grade #0000 ultra fine steel wool combined with soapy water.
- Execution: Spray window cleaner or alcohol liberally onto the glass. Slide the fresh steel razor blade smoothly across the sap spot. The hardened sap will snap off cleanly without scratching tempered auto glass. Avoid touching adjacent rubber window seals or painted pillars with steel razors.
2. Removing Sap from Textured Plastic Trim and Bumpers
Unpainted black plastic trim, side mirror housings, and roof rack mounts present a unique challenge because sap settles into microscopic surface texture pores.
- Primary Solvent: Alcohol based hand sanitizer gel or specialized citrus tar removers. Hand sanitizer gel clings exceptionally well to vertical plastic surfaces without running.
- Cleaning Tool: Soft bristled detail brush or soft toothbrush.
- Execution: Apply a dime sized dollop of hand sanitizer gel directly to the plastic sap spot. Let it dwell for 2 minutes. Agitate gently using a soft bristled brush in small circles to lift dissolved sap out of the plastic grain texture. Wipe clean with a damp microfiber cloth.
3. Removing Sap from Convertible Fabric Tops
Fabric and vinyl convertible tops require non solvent methods to avoid dissolving waterproof coatings or backing adhesives.
- Primary Solvent: Commercial convertible top cleaners or heavy duty citrus cleaners diluted according to manufacturer directions.
- Execution: Apply cleaner to the fabric, allow 3 minutes dwell time, and scrub gently with a horsehair detailing brush along the grain of the fabric weave. Rinse thoroughly with low pressure water and allow to dry completely before applying a fabric protectant spray.
Phase 4: Neutralize and Rebuild Paint Protection
Removing tree sap chemically resolves the immediate contaminant, but it creates a secondary issue: solvents completely strip away all protective carnauba wax, synthetic paint sealants, and ceramic spray coatings in the treated area. Leaving raw clear coat exposed to oxygen, UV light, and future contamination invites rapid paint degradation.
Step 1: Chemical Neutralization and Final Rinse
Once the sap is fully removed, immediately spray the area with a quick detailer spray or wipe it down with a water dampened microfiber towel. This neutralizes any residual alcohol or solvent trace left on the panel, preventing chemical staining.
Step 2: Surface Decontamination and Inspection
Inspect the paint under direct lighting. If the sap sat on the paint for weeks prior to removal, you may notice a dull spot or shallow crater where the organic acids etched into the clear coat. Light etching can often be corrected using a hand applicator pad with a fine finishing polish. Work the polish over the etched spot for 60 seconds to smooth out clear coat edges and restore crystal clarity.
Step 3: Reapply High Grade Paint Protection
Protect the freshly exposed clear coat by applying a dedicated paint sealant, high percentage carnauba wax, or ceramic coating spray.
- Carnauba Paste Wax: Provides deep gloss, excellent water repelling beads, and natural sacrificial protection for 60 to 90 days.
- Synthetic Polymer Paint Sealant: Delivers superior chemical resistance and UV protection lasting 6 to 12 months.
- SiO2 Ceramic Spray Coating: Formulated with silicon dioxide compounds that create an ultra hard, hydrophobic barrier that prevents future tree sap drops from bonding strongly to the paint.
Critical Mistakes to Avoid: The Do Not Touch List
Protecting your vehicle paint finish requires knowing what tools and chemicals to avoid at all costs.
⚠️ CRITICAL WARNING ZONE
- 1. NEVER use metal razor blades on painted metal or plastic body panels.
- 2. NEVER use household kitchen scouring pads, Magic Erasers, or steel wool.
- 3. NEVER use harsh industrial chemicals like pure acetone or lacquer thinner.
- 4. NEVER dry rub or scrape hardened sap without chemical lubricant.
1. Metal Razor Blades on Paint
While metal razor blades work wonders on glass, using a metal blade on painted body panels will gouge through the clear coat and base paint in a fraction of a second, exposing raw metal and creating immediate rust vulnerabilities.
2. Kitchen Scouring Pads and Household Abrasives
Green kitchen sponges, abrasive scouring pads, and melamine foam erasers (Magic Erasers) are composed of ultra hard microscopic abrasive fibers. Using them on clear coat creates massive hazing, dull spots, and deep scratches that require professional sanding and repainting to fix.
3. Harsh Industrial Solvents (Acetone, Paint Thinner, Gasoline)
Pure acetone (nail polish remover) and aggressive lacquer thinners chemically melt acrylic clear coats and soften automotive paint finishes within seconds. Gasoline contains aromatic hydrocarbons that leave oily residues and can cause permanent clear coat staining or swelling.
4. Dry Scraping or Fingernail Picking
Attempting to pick off hardened sap with your fingernails or a dry plastic card concentrates high shear stress on the clear coat perimeter. This frequently tears away microscopic flecks of clear coat along with the sap, resulting in permanent paint pitting.
Frequently Asked Questions
Will rubbing alcohol damage my car paint?
No, isopropyl alcohol (both 70% and 91% concentrations) is completely safe for factory automotive clear coats when used correctly. Detailing professionals regularly use isopropyl alcohol solutions to wipe down paint panels and remove polishing oils before applying ceramic coatings. However, alcohol will strip off existing wax layers, so you must reapply wax or sealant after sap removal.
Can a clay bar remove tree sap?
Automotive clay bars can remove small, microscopic sap overspray mist. However, for large, raised sap blobs, a clay bar is ineffective and can drag trapped sap particles across the paint, causing swirl marks. Always dissolve thick sap chemically first, then use a clay bar to pick up remaining micro contaminants.
How long does it take for tree sap to permanently damage car paint?
In warm weather and direct sun, acidic tree sap can begin etching clear coat within 24 to 48 hours. In cooler weather, it may take several weeks. The faster you dissolve and remove tree sap, the lower the risk of permanent clear coat cratering.
Is WD40 safe for removing tree sap from car paint?
WD40 contains petroleum distillates that can soften fresh tree sap. While generally safe for modern clear coats, it leaves behind an oily film that requires washing off with car shampoo before applying fresh wax. Isopropyl alcohol remains a cleaner, faster, and more effective choice.
Conclusion
Safely removing tree sap from your car paint requires a disciplined, chemical first mindset. By avoiding aggressive mechanical scrubbing and choosing safe, effective solvents like 91% isopropyl alcohol or commercial automotive tar removers, you preserve the structural integrity and high gloss shine of your vehicle clear coat.
Remember the golden rule of sap removal: let the chemical solvent do the work through proper saturation and dwell time. Always work in the shade on cool panels, use soft plastic razor blades for thick sun baked deposits, and follow up every cleaning session with a fresh application of carnauba wax or ceramic paint sealant to guard against future environmental contamination.
Next Step
Take action today to safeguard your vehicle finish against permanent sap damage:
- Inspect Your Paint: Walk around your vehicle under good light to locate any sticky or hardened sap spots before sun heat causes clear coat etching.
- Assemble Your Sap Removal Kit: Stock your detailing garage with 91% isopropyl alcohol, plush 400 GSM microfiber towels, soft plastic razor blades, and an SiO2 ceramic protection spray.
- Restore Your Protection: If you recently removed sap spots, reapply a high quality paint sealant or wax immediately to seal the exposed clear coat.
For severe sap damage or deep clear coat etching, consult a certified professional automotive detailer for a multi stage machine paint correction service.